2014年9月29日星期一

Dual Bottom Coil Experience——iClear 16 clearomizer Review

The iClear 16 clearomizer was the first of its’ kind from makers Innokin to provide the dual bottom coil experience! Originally designed for the iTaste MVP 2.0, the iClear 16 works great with all 510 threaded eGo batteries or other 510 devices with an adapter. It sports a smaller 1.6 mL capacity and a removable top piece for easy filling. Whether you’re just getting started with vaping, or a seasoned vaper; the iClear line doesn’t disappoint and if you’re looking for a great clearomizer for an even greater price, look no further.

Coil Design & Atomizer Heads

iclear coil heads
Dual bottom coil
The iClear 16 is a dual bottom coil clearomizer. It includes 4 long wicks (2 wick per coil); which provides a stronger throat hit, more vapor production, and a greater overall performance. If you are struggling trying to get more vapor out of your iClear 16, you might be vaping too thick of an e liquid. Visit our PG vs VG page to find out the difference between the two so you can make the best decision for yourself.
The design of the coil heads also provide a more consistent vaping session and e juice flow to the coils from nearly any position. They have generally had better reviews than single coil clearomizers. Eventually your coil head will burn up and start losing it’s quality; thankfully the iClear 16 comes with replaceable coil heads. To replace the coil heads on the iClear 16 follow these steps:
  1. Unscrew the base (battery end) from the tank
  2. Unscrew the atomizer head (ropey looking wicks) from the base
  3. Screw on a new atomizer to the base
  4. Screw back on the base to the tank
NOTE: All parts are easily removed for cleaning or replacement.
The replaceable coil heads 5-pack make this product more affordable. They are stronger and more sturdy than expected, and can easily be removed without any issues.

Capacity & Filling Instructions

The capacity of the iClear falls a bit short for my liking, however given the size and quality of the clearo; I won’t complain that the 1.6 mL capacity does it’s job. Since the drip tip top comes off easily, it is important to go over the proper steps to fill the iClear 16 correctly so you don’t flood the clearo or make it gurgle. The following steps show you how to properly fill:
  1. Unscrew the mouthpiece
  2. Tilt and fill along the sides of the tank (avoid getting e liquid into the air-hole in the center).
  3. Screw the mouthpiece back on
  4. Vape away!
ejuice syringe
If you are looking for the best experience vaping on the iClear; you get the best flavor when you keep the wicks wet in e juice. You can also tilt or roll your clearo tank to move the e liquid up towards the mouthpiece before or during puffing. I recently found a pretty cool syringe that you can use to fill your tank with juice (it does wonders), you can find them over at litecigusa.net.

Threading

The Innokin iClear 16 comes with eGo threading and fits on most starter kit batteries. In fact, the iClear is one of the more popular clearomizers to be advertised with the Innokin iTaste MVP 2.0. With a lithium-ion polymer 2600 mAh battery, the iTaste MVP is a great alternative to other more expensive mods. Surprisingly, the smaller iClear 16 works like a charm on the iTaste.

Ending Thoughts

Overall it’s truly hard to beat the simplicity of the iClear 16. It functions well and is great for both beginners and experienced vapers alike. The dual bottom coils are a great touch and the fact that you have replaceable coil heads is a nice add-on. Every iClear clearomizer that Innokin come out with has performed admirably well, and they are a pretty reliable bunch of clearomizers.


Reprinted from bestclearomizer 
Never miss more savings at Hekvapor and get away from stink-eye there.
Like Hekvapor & enjoy FREE personal vaporizer.

Tips for using the Innokin iTaste DRV—— Let the in-car vaping gear color your driving


As I mentioned,  DRV is a little odd because I’m just not used to holding my vaporizers so close to the button the whole time. Further exacerbating that is this heavy-duty cable.  It’s nice in that it’s very unlikely to break, but it also has the habit of tugging on the button area while vaping.
itaste drv review in car 300x213 image
vaping in your car
Here’s a tip: 
stretch out the cable when you first get it, it’s very tight and giving it a few good pulls to its full length will relax the coils a bit and make things more manageable.
Thanks to the screw-in connector for the cable to the main body, there’s no worries about pulling the cable loose.

Also, depending on where your power port is will dictate how well this thing works as an accessory.  In my car, the power port is down low in a cubby, so it’s not exactly easy to read and adjust while driving.  I normally just set it and forget.  The big dial does mean it is easy for me to reach down and turn it a click or two, if I know where I am.

I played with both the auto and manual bodies, of course. I liked the draw on the auto battery, and at first I found it a little easier to deal with than the manual. That was before I got the cord broken in and got used to the manual body, which I naturally prefer.  If you happen to be in a driving situation where you need both hands, the auto body might be a good choice for you.
itaste drv review kit detail image 300x221 image
Easy to love it
Performance really didn’t differ between the two bodies.  The Innokin performed great.  To be honest, I never pushed my luck with the higher power settings.  I tend to use stuff that’s happy around 5v or so.  I certainly noticed when I was running at voltages that creeped into the higher 5v spectrum.
In kit form, the DRV comes with a pair of iClear 16B clearomizers which rock dual coils.  They can handle a fair amount of voltage, but 6.4 is still excessive in my book.
I have about a 30 minute commute to work each way, so for me I really like having a dedicated in-car vaping device.  I can save my batteries on my other devices and always have a spare handy in my car.

Still, the DRV is a bit spendy, so I imagine this will appeal mostly to people who drive a lot.  They should sell this thing at truck stops!  If you’re behind the wheel a lot, you might want to consider the purchase.

on by .


Never miss more savings at Hekvapor and get away from stink-eye there.
Like Hekvapor & enjoy FREE personal setup

Pick of Hekvapor week——Innokin iTaste DRV Review ——Designed for vehicular vaping

The Innokin iTaste DRV is a specialized vaping device recently released by e-cigarette manufacturer Innokin. Essentially, the DRV is a dedicated in-car vaping system.  I’ll admit this probably isn’t a device for everyone, but for people who drive quite a bit, it might just be the best thing ever. Read the review and find out the good, the bad and the strange.

iTaste DRV Design

Innokin’s DRV is an odd bird to say the least.  The company has never been afraid to put out oddball advanced personal vaporizers (I’m lookin’ at you Cool Fire II).  Clearly they don’t have a problem breaking the mold.
itaste drv review wheel detail 300x209 image

iTaste DRV

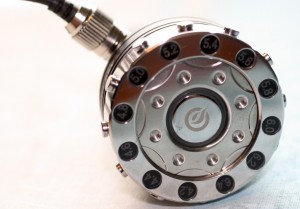
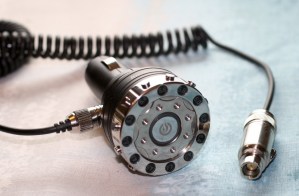
Let’s start from the basics. The DRV is a device designed specifically as a car accessory.  It has no batteries of its own. Basically it’s a big honkin’ dial attached to an automotive power plug.
The idea is that you plug this iTaste model directly into the accessory power port (cigarette lighter for you old timers) in your dashboard.  What you then have is a new dial to accompany all the assorted other knobs and dials that are likely already in your car.
The dial itself is a nice, large device. It has an action very similar to Innokin’s other dialed vaping devices like the SVD and VTR, only much larger. The dial is also backlit.
There are a series of circles on the inner perimeter of the face. Each circle features a backlit number that lights up when selected. The options are various intervals between 4.2 and 6.4 volts.

Yes, I said volts.  Apparently the company decided to buck the wattage trend and kick it old school with variable voltage similar to the CLK I reviewed earlier. The version I received was bundled with a pair of the excellent iClear 16D clearomizers that ship with the CLK. Of course the other wait a minute moment is that it tops off at 6.4 volts, quite a bit higher than the average variable voltage device commonly available these days.
All of this is packed into a metal, not plastic housing just in case you were wondering.
itaste drv review cable and stuff 300x196 image
Delicately Designed for you
Ok, getting back to things.  At the center of the dial is a power button which is also illuminated.  This is particularly handy if your car has one of those power outlets that doesn’t shut off when the car does.

Now you might be wondering how you get to the vapor.  On the side of the Innokin’s body is a port to which a thick coiled cable is attached.  If you really want an old-timey car accessory comparison, it sort of reminds me of a CB Radio cable.  The other end of the cable has a receiver to which you can screw one one of two bodies, an automatic body and a manual body.
The manual body has an illuminated activation button. Both bodies feature an eGo connector and are on the somewhat short side, measuring just a couple inches.

 
In-car vaping

The Innokin iTaste DRV is probably the world’s first dedicated in-car personal vaporizer system.  Boasting a very solid design and a large illuminated click wheel, it feels like it really belongs in a car.  Voltage output up to 6.4 volts ensures it can handle any demand.  This is a good choice for those who spend a lot of time driving.  Others might want to just go for something like an MVP instead.
Pros:
  • Designed for automotive use
  • Large controls for easy use
  • Solid metal construction
  • Power to spare
Cons:
  • Very specialized product with limited appeal
  • Ergonomics depend on car design
  • Cable can be awkward
on by .

Never miss more savings at Hekvapor and get away from stink-eye there.


Like Hekvapor & enjoy FREE personal setup

2014年9月24日星期三

The wholesale Vamo electronic cigarette review by Hekvapor

 
 Vamo—— An electronic cigarette that offers variable voltage, variable wattage, battery protection, atomizer protection, multiple battery options, RMS and Mean Average metering, and more, is pretty commonplace today, but few are $50 devices.
If you’re going to go for price and as many features as that price will allow the VAMO 5 is right up your alley. 

If you’re willing to spend more to get a much longer lifespan for your device, then maybe you need to look around at other devices. I can’t come out and say it’s a great buy or a lousy buy.  I can’t find anything really negative about it, nor can I find anything to get excited about.

Quick Details

  • Brand Name: Hekvapor
  • Model Number: wholesale vamo
  • OEM/OED: available
  • Certificates: CE & RoHS
  • Battery: 900mAH/2200mAh
  • Delivery time: 1-3 working days
  • Battery support: 18350/18650 battery
  • Variable voltage: 3V-6V
  • Color: chrome,chrome black,blue,gold,purple,orange
  • Thread: 510/eGo
  • delivery way: DHL, TNT, EMS, and UPS
  • Package: gift package 
Features 
  • LED Battery Power Display
  • OEM, ODM is welcomed
  • Suit for all ego / 510 series
  • Overtime Vaping Warning
  • Built-in 3 digit display ( Ohms meter , Volts /Watts , Atomizer voltage output )
 
Product Specifications: User's tips
1. To adjust voltage from 3V to 5V.
2. Battery capacity is 900mAh and 2000mAh.
3. With digital LCD screen display, it shows how much power has been used and how much is left.           
4. Put the atomizer on the battery, then it will be shown atomizer resistence on the LCD screen, and it can test if the atomizer is broken or not.   
5. Unique 3 buttons layout for easy using. 
6. Output voltage: 3.0-6.0V
7. Output power:3.0-15.0W
Note:
a.The voltage is adjustable from 3V to 6V. The higher voltage, the bigger amount of vapor.  
b.The battery is turned on/off by pressing the button 5 times within 2 seconds. 
If you are looking for a VV/VW there are many choices out there that do a good job, are aesthetically pleasing and they function well. What makes the VAMO any kind of a contender?
If you’re a VAMO enthusiast you’ll like this version better than any of the others that came before. If you’ve never owned a VAMO you haven’t missed much, and buying a Rev 5 as your first VAMO purchase isn’t really a bad choice, for the price.
 

Innokin Cool Fire 2 Review- Released by a seasoned vaper


At first glance, the Cool Fire 2 from Innokin looks like a novelty PV Mod, targeting those with a military background, or people who just like to blow chit up. Even though I’m a Veteran, I really didn’t think much of the grenade look…until I used it!
I have to admit, initially I was on the fence whether or not I even wanted to give this variable wattage mod a shot. I mean, really? A grenade? Why would I, or any one else for that matter, want a mod that resembles a grenade?
I’m glad I took the chance, because this little mod is…the “bomb”!
Cool Fire 2
Vaping Grenade?

Weighing in at 199 grams, or 7 ounces, the Cool Fire 2 from Innokin is a 510 threaded, variable wattage device that runs on a 18350 battery. Like its big brother, the iTaste 134, the Cool Fire 2’s wattage output is adjusted with a rotational wheel. Unlike the iTaste 134, the Cool Fire 2 comes in a much smaller package, yet is solid.
Adjustment of the wattage is accomplished in the following increments, 7.0, 8.0, 8.5, 9.0, 9.5, 10.5, 11.0, 12.0, 12.5. Why, I don’t know, but it works.
The Cool Fire 2 is also jam packed with many features, such as:
  • Battery Level Indicator.
  • Reverse Battery Protection Circuit.
  • Built in 7A fuse for protection and stability.
  • Short Circuit Protection.( 0.6 +/-0.2 ohm )
  • ON/OFF battery switch.
  • LED Battery Power Display.
  • Low Voltage Warning.
  • Overtime Vaping Warning (10 seconds switch cutoff).
  • Battery safety protection (Vent holes).
  • High compatibility 510 connector: Will work with iClear10, iClear16, and iClear30 clearomizers, as well as standard 510 accessories.
Like all Innokin devices, activating the button is the same, three clicks to turn on and off, green light shows battery is fully charged, yellow shows battery is mid, and red shows that battery is in need of a charge.
Col Fire 510 Connection
How to turn on and off?
Cool Fire 2 510 Connection
The 510 connection post is free floating. What does this mean? You don’t have to manually adjust the center post when installing different types of tanks, atomizers, or cartomizers. It’s also a copper contact.
Cool Fire Battery Contact
添加图片说明
Cool Fire 2 Positive Battery Contact

A look inside the Cool Fire 2 mod.
Cool Fire 2 Top Cap
Cool Fire 2 Top Cap
This mod comes with a “beauty ring”, or a sleeve with two air holes opposite of each other which allows air flow when your tank is flush mounted, or when using a clearomizer, which will be mounted lower into the well.
Cool Fire 2 Safety Vents
Safety vent holes in the end cap of the Cool Fire 2.
Cool Fire 2 Threads
添加图片说明

Cool Fire 2 Threads & negative battery post.

The one complaint I have regarding the Cool Fire 2 are the threads. Threading is constructed of aluminum. Over time, I don’t know how they will hold up, I really would have preferred a robust stainless steel construction in these areas.
添加图片说明
The negative battery post is, like the positive, constructed of copper, with a spring providing tension. When inserting a battery and installing the end cap, the tension created by this setup, can wear down the threads if not performed with care.
Cool Fire 2 Handling
I absolutely love the way the Cool Fire 2 feels in the hand. This is one of the most comfortable devices I have had. It just feels natural to hold, and utilize. Big plus! Love it!
Cool Fire 2 Tanks Tested
I evaluated five different types of tanks/atomizers to see if there was any air restrictions. The iClear 30B(included with purchase), a LavaTank with cartomizer, a clearomizer, a DCT cartomizer and tank, and a rebuildable dripping atomizer(RDA). All performed as expected, with no negative effects.


Putting the Cool Fire 2 through its paces, I dialed it in at its maximum setting, 12.5 Watts, and measured the voltage delivered with various setups. I did attempt to use this mod with a 0.6 Ohm coil, and it did not fire. By the specs given by Innokin, this was a expected result…but I had to try for myself.

Ohms
Battery Voltage
Voltage Under Load
RDA @ 1.0 Ohms6.103.57
DCT @ 1.5 Ohms6.104.14
iClear @ 2.0 Ohms6.105.10
Boge @ 3.0 Ohms6.106.10
From the above readings, the Innokin Cool Fire 2’s circuitry is as precise as they come. You can validate my “measured” results with Ohms Law here. What I did manage to identify, is the Cool Fire 2 does in fact work with a atomizer/cartomizer down to 1.0 Ohms.

What I think of the Cool Fire 2

I love just about every thing about this variable wattage mod. Very easy to manipulate the controls, extremely easy to use in the hand, and it delivers what it says. Very robust, minus the threading, stable when setting it aside, and is a package that is not overly big in size. The Good
What can I say, I think almost everything about this mod is good!

The Bad
  • Threading – I’m not impressed with the aluminum threading. This mod should have come with stainless steel threading, IMHO.
  • Looks – The “regular dude”, anti-military crowd, or the anti-vaping community could use its looks as a way to attempt to further their “cause”?
The Ugly
Nothing!

Final notes on the Cool Fire 2 from Innokin
If you’re looking for a solid, variable wattage device that isn’t as large as the iTaste 134, the Innokin Cool Fire 2 just may be your ticket. Variable wattage, with all the safety features you need in a small package, and just feels good in the hand.


Never miss more savings at Hekvapor and get away from stink-eye there.

Like Hekvapor & enjoy FREE personal vaporizer.

Modular Mechanical Mod with a recessed magnetic switch--Tarsius Customs 4nine Mod Review -by seasoned Vapers at Hekvapor


Like Hekvapor on the Facebook and win FREE E-cigs


4Nine Mod is the newest and smallest magnetic mod on the market right now! 
The 4 Nine Mod is an 18650, 18490, and 18350 tube mod with a floating magnetic button, and no top pin to fit all batteries. 
The seams on the 4Nine Mod is one of the most precision machined mod out on the market right now. When you change the tubes on the 4Nine Mod, you cannot see any seems and looks like one solid tube. 
This is a rare mod to find, and we have limited advance sale on the 4Nine Mod!

Modular Mechanical Mod
Product description:
* Shortest Production Full Mech Mod
*304 Grade Stainless Steel and Brass
*Pin-less Design
*Magnetic Swicth
*Modular design to accomodate all 18*** battery configs


[​IMG]


Being that the 4nine is a hybrid connecting mechanical, there is no 510 positive contact within the top cap. This device is designed to use the 510 pin of the atomizer to make direct connnection with the battery. As such, it is important to use an atomizer with a 510 pin that protrudes beyond the 510 threading by at least 1mm, which is the minimum length required to use this mechanical mod.


While 1mm is the minimum recommended length for the 510 pin, it has been my experience that a longer 510 pin of at least 2mm is ideal, as the length of the 510, in addition to the length of the battery used, directly affects the length of the throw on the switch. The longer the 510 pin, the shorter, and smoother the throw of the switch will be.


The delrin insulator in the top cap is there to prevent shorting while in use, and there are also two vent holes drilled into the top cap.


[​IMG]


The 4nine clone has a free floating copper magnetic switch that works in opposition with the magnetic delrin spacer to complete the circuit between the battery, and atomizer when activated. You install the switch by sliding it into the main body tube, where it sits into a groove at the base of the tube. It can be a bit tricky to get the switch to fall properly into place, and so it is recommended that you install the switch through the 18350 tube, prior to connecting the extensions.


Being that the 4nine uses a recessed switch design, it can stand in any battery/set up configuration without firing under its weight, and so there is no locking mechanism on the 4nine. The deep cut out’s at the base of the main tube allows your finger rest within the cut, and activate the switch.


The magnet within the delrin spacer has a North and South pole. You must attach the spacer to the battery with the opposing pole facing the magnet inside of the copper switch. The opposing force between the two magnets is what moves the battery to make connection with the 510 fire pin on your atomizer.


You will know that your delrin spacer is affixed to the battery on the wrong side if you insert the battery into the tube, and it pulls the switch onto the spacer. To make it quick, and easy to know which pole needs to face the switch, I used a sharpie to mark the opposing side of the magnet in the spacer, as shown in the photo below.


The copper encased magnet is also threaded, and can be screw in, and out of the delrin spacer also shown below. You can unscrew the magnet on the side connecting to the battery to shorten the distance between the battery and the 510 pin on your atty. In addition to a long 510 atomizer pin, nipple top batteries are also recommended for use with the 4nine mod, as it also directly affects the overall length of throw of the switch. The further the free floating switch has to travel up into the tube to make a connection, the more grinding, and crunchy the switch will feel.


A long 510 atomizer pin, and a nipple top battery within a properly sized 4nine clone, will make for the shortest, and smoothest throw. Flat top batteries can be used with 4nine so long as the delrin insulator remains in the top cap however, using a flat top battery will increase the throw of the switch making it grindy, unless you find a way to mod around it. Unscrewing the threaded magnet in the delrin may be of some help here.


The 4nine gets its name from the fact that is it a mere 49mm tall in 18350 mode, making it truly one of the smallest mechanical mods available, a claim formerly owned by the Astro by Kato. The 4nine is also much smaller than the average mechanical mod in all battery configurations. In 18500 mode (64mm), the 4nine is still smaller than most mechanicals in 350 mode. This 4nine clone is 79mm in the 650 battery configuration, as is the authentic 4nine by Tarsius Customs.


[​IMG]


Conclusion

The 4nine is an advanced user device, and there are several considerations that must be made in order to use this mechanical mod safely, and properly. The appeal of the 4nine is its minimalist design, compact size, and hybrid type 510 connection. There are no adjustable pins, springs, or intricate switch assemblies to contend with. Being that the top cap is constructed of brass, which is a softer metal, care needs to be taken with the threads, and so it pays to be mindful when attaching and removing your atomizer.


There are other cloned versions of the 4nine that offer a more seamless appearance of the tubes however, those versions of the 4nine are also mis-sized at 82mm overall, and 52mm in 350 mode. While this version of the 4nine does not have the seamless tube appearance of the authentic, it is properly sized in all configurations like the authentic (49mm/350, 64mm/500, 79mm/650), and the 4nine mechanical mod is all about SIZE.


This clone even improves upon one aspect of the original 4nine, and that is the copper encased magnet within the battery spacer, unlike the authentic which has only a bare magnet set in delrin. Having the battery in contact with that copper ring should increase conductivity, even if only slightly.


The other nice bonus of the 4nine clone is that the hybrid top cap is compatible with 20x.5mm threaded Stingray mods, and the Stingray does work beautifully with the 4nine hybrid cap.


With the right atomizer, and battery, the 4nine is nice little mechanical.


Never miss more savings at Hekvapor and get away from stink-eye there.
Like Hekvapor & enjoy FREE personal vaporizer.

2014年9月18日星期四

Kato hammer mod kit clone Review -- A good reproduction & Easy to wrap , Share the truest review with all vapers


Like Hekvapor on the Facebook and win FREE E-cigs  

Hammer Clone Mechanical Mod kit bundled with the Kayfun Lite / Russian 91% clone in all stainless steel This is a clone of The Hammer by Kato. Most of you already know about this mod, this is the third improved batch of the clones, and Tobeco is the only company right now that are producing these. The latest improvement is now ALL your tanks will fit the 510 connection.

Hammer Product Description:
  • 18350 & 18650 full mechanical.
  • 1:1 replication of the original.
  • 510 connection
  • Unique serial numbers.
  •  
Included in the Hammer Kayfun Kit:
  • Hammer Mod
  • Kayfun Stainless Steel Center Tank (This kit does not include the plastic tank option, includes only the SS Tank)
  • Unit Extension tubes included for 18490/18650
  • Kayfun Lite style drip tip
  • Micro screwdriver
  • Allen key
  • Spare screws
  • Nice decorative box
This Hammer MOD by Tobeco is a good reproduction, but bear in mind it is a clone, so therefore will not have the quality of build that the $500.00 original will have. In some cases the finish is not as nice and could use a bit of polish. if you are not an experienced Vaper, you should probably do some homework before you invest. 

It also is not a powerful Mech MOD, if you are looking for something to fire your low or sub ohm atomizers, you may want to look elsewhere, this Mech MOD seems to like Tanks like the Protank 1,2 and 3 or other middle range vaping devices.
Other than that, this is a nice super solid heavy MOD that you will love holding in your hand. It works with an 18350 or 18650 battery
 
A good reproduction


Great price

Easy to wrap

The Kayfun Lite is also a clone reproduction, but an excellent one. never in my life have I vaped something as easy to wrap, (easier than a Protank), and more satisfying to vape than a Kayfun. The flavor is unforgettable, I think it is better than dripping! It does require a knowledge of wrapping coils and a bit of rigorous maintenance when it comes to making sure every gasket is in place, every time, but the result is the Best Vape Ever for this Gal and I was hard pressed to put them up for sale at all!

Although this is a great price for both the Hammer and the Kayfun Lite, I would suggest separating them immediately on arrival and putting the Kayfun on your best regulated VV/VW device and keeping the hammer for your Protanks, Puritanks and other simple, less power dependent devices. Not that The Kayfun won't work on the Hammer, it just works soooo much better with a device that turns up the heat!


Never miss more savings at Hekvapor and get away from stink-eye there.

Like Hekvapor & enjoy FREE personal e-cig kits

Ecounter a Tac mods USA AR mod Review & Share with all Mod Lovers


AR MOD by Tac Mods USA 

Like Hekvapor on the Facebook and win FREE E-cigs 


The AR Mod is a replica of an AR-15 Rifle Barrel
   This is a very unique mechanical mod that also comes equipped with Silver Plated Copper. It is a patent pending design that emulates the barrel of an AR-15. At first glance this mod is something special, and makes you want to try it simply because of its uniqueness. With 6 vent holes on each of the 4 sides, this really helps with venting of the battery and more importantly adds to the unique look of the mod.

When you open up the AR MOD you notice that this piece of metal is manufactured in the USA. 

   Solid construction and solid piece of stainless steel. The mod feels sturdy in your hand but small enough to have be convenient for an every day vape. The contacts are copper and I heard they are going to release silver contacts in the future. The firing button is solid as well. You don’t have to worry about loosening your button or unnecessary spinning because it is locked into an octagonal slot which holds the button in place. The button is recessed so you can stand it up on the table and not have to worry about misfires. AR MOD Pictures:

AR Mod


Unique & Cool


The top cap is 22mm to make it flush with most atomizers, and the mod weighs in at 186 grams without the battery.      Currently the AR MOD is only able to house 18650 batteries, which may be a down side for some, but for me it is not an issue as it is my go to battery. The voltage drop for the AR MOD is around .5 as well. So this device is very conductive.

Overall a great mod and you are supporting a USA manufacturer when you purchase this. You can find all types of paint style of the AR Mod at hekvapor.com.


Vape Jam Heimdall mod review-A True Experience With The Heimdall Clone by Seasoned Vaper

Posted by  


Foreword

There are many reasons for not to wanting to review, or even own, any type of clone in the electronic cigarette industry. The reasons against owning one are based primarily on personal safety issues, including but not limited to; ‘inferior materials, manufacturing shortcuts, and time to market.’ – Any one of these reasons can cause a serious problem, unless you know the clone maker or trust the vendor that has made the decision to sell it. I won’t even get into matters that have always been a huge concern of mine, like ‘intellectual property rights’.
The reason(s) for considering a review or a purchase of a clone has to do with, well, one thing. Price. The HEIMDALL STYLE MOD clone being reviewed today is $170 less than the original Heimdall from the Philippines.

The Clone is here to stay

As long as high-end mechanicals are in the $200 and up price range, and as long as China remains firm in their desire to clone anything and everything they can, clones in the eicgarette industry are a reality that won’t go away anytime soon. And most vapers are fine with clones, prefer them actually, so that desire will be sated one way or another.
The number of people that can afford a high end mod is tiny when compared with people that want to vape with a high end mod, and when presented with two devices that look the same, and vapes the same (or appears to), most people are going to go for the clone. You can’t really blame them, high-end mod makers do not go out of their way to explain (justify?) the high price of their mods, and clone makers are getting better and better at ripping off the specs of the originals.

The Clone and the Counterfeit

Spinfuel’s attitude about clones is still an attitude in progress. Our real problem lies with companies that produce counterfeits of popular products made by companies that have spent a lot of money in R&D only to see it ripped off and presented as the real thing, right down to the barcode. At least when dealing with clones the manufacturer identifies the product as a clone and doesn’t try to hide the fact. Admittedly, both practices leave a nasty taste in my mouth, but clones are the lesser of the two evils.


Features of a $25 HEIMDALL STYLE MOD CLONE

510 threading connection
Floating 510 center pin
Brass contacts
Adjustable positive contact
Bottom spring-loaded firing button, with reverse-threaded locking ring
Laser engravings
21.8mm diameter
Full set of tubes (18350, 18500 &18650)
Houses single 18350/18500/18650 battery (batteries sold separately)

Specs for the HEIMDALL STYLE MOD (clone) are as follows…

SIZE
              DEPTH:  22MM
              HEIGHT: 82MM
              WIDTH:   22MM
              WEIGHT: 0.202g
       

THE REAL HEIMDALL Mech Mod – $200

The Heimdall mechanical mod is a product of a Philippines, by a company called Vape Jam. The Feature Set for this $200 mod is as follows:
Heimdall Mod by Vape Jam Mods
Constructed of Australian Brass
Mod includes 18650, 18500, and 18350 tubes
Soft firing bottom button
Reverse locking mechanism
Silver plated copper pins
Floating and telescopic positive pin
22 mm diameter
Made in Philippines
Nearly always ‘Out of Stock’
HEIMDALL ORIGINAL

As you can see in the photos, they look very much alike, the Heimdall clone is a nearly a 1:1 clone, with fine differences based on the quality of the brass used in its construction, the silver plating, the ‘number’ on the tube, and so on. In addition, instead of being massed produced in an assembly line in China the Vape Jam Heimdall is built with extreme care in small lots. They are, without a doubt, hard to find, and the Heimdall is a high-end mod of incredible fit and finish.

Heimdall Clone vs. Heimdall Original

I owned an original Heimdall for a couple of months, until a friend of mine made the jump to mech mods and he instantly fell in love the Heimdall. I have way too many devices anyway, so I gave it to him.
heimdall-clone
heimdall mod at Hekvapor
Since I had experience using the real Heimdall I was the obvious choice to review this clone… I guess.
My Experience With The Heimdall Clone

It’s true that the Heimdall clone suffers from a bit of battery rattle, the center pin isn’t as precise or as moveable as the original Heimdall, and, if I remember correctly, the silver plating isn’t as thick. Another thing I noticed about this $30 clone is the tube and caps do not screw together like the hot-knife-through-butter smoothness of the real Heimdall, but it isn’t bad either. Would you expect any different?
Where it matters, performance, the $200 Heimdall and the $30 Heimdall clone are so close most vapers, yours truly included, can’t tell the difference. I’m not saying there isn’t a difference, what I’m saying is that the differences are undetectable to the average vaper and can be mostly seen when hooked up to certain testing equipment.
To put it as simply as possible, would it matter to you if a high-end mech mod, costing somewhere in the neighborhood of $200, output precisely 3.7v every single time you pressed the firing button? Would you accept a lower-end device, costing in the range of $30, that output 3.69v 90% of the time and 3.71v the other 10% of the time? What about drop off? How much of a difference would it make in your vape experience if the $200 mod had virtually zero drop off while vaping and the $30 clone experienced slight drop offs while vaping?

Simplicity

A mechanical mod is really a very simple device. The purpose of every mechanical mod is also simple: to send uninterrupted, accurate, power to the atomizer. A good mech mod does so safely, consistently, and accurately. A good clone should do the same thing. It doesn’t take $200 and more to build a device that can do that, and do it extremely well. That’s not to say that a product like the original Heimdall isn’t worth the $200 price tag, if you’re looking for more than the simple performance of a mechanical mod.
The High-End Mech Mod – In Brief
   A high-end original mod maker nearly always uses superior metals, and assembles them with the utmost care, exacting precision, and with real passion to build and sell a product they can be proud of… and the owner can be proud of. A high-end mech mod will last decades and its performance may never degrade.
The Low(er)-End Mech Mod Clones – In Brief
   A clone costing a fraction of the real thing can, and often are, made of the same materials used in the original high-end device. When this happens the shortcuts are made in the quality of the materials.
   A high-end mech mod may use 99.9% silver for its plating and a clone may use 82% silver. A high-end mech mod may use 18k gold contacts and a clone may use 10k gold contacts. Both companies claim silver plating and gold contacts…but which one will provide a cleaner line for power transfer, which one will last longer?

In the end, I find myself torn between the high-end mods and their clones.  
   If I could afford it easily I would have the very best of everything I own, but that’s not likely to happen any time soon.  I suppose when it comes to electronic cigarettes and other vaporizers, what it comes down to is how far down the rabbit hole you are. Is the act of vaping so much a part of your life that spending $170 more for a device that looks the same, and vapes nearly the same as the less expensive one make sense to you? I can’t answer that, only you can.

Never miss more savings at Hekvapor and get away from stink-eye there.


Like Hekvapor & enjoy FREE personal e-cig kits